|

|
|
|
|
||
Installing an Ultrasonic Parking Assist System in a Gallardo
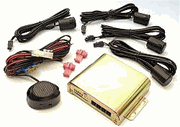
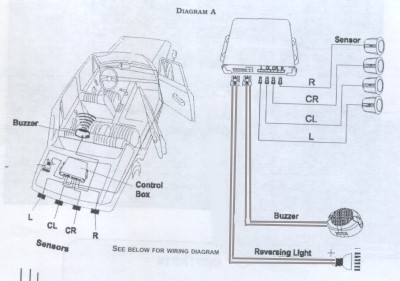
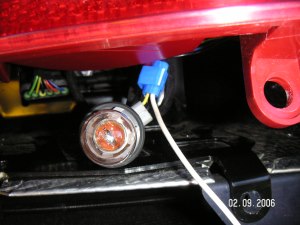
The rear view from inside a Gallardo when parking or reversing can sometimes be a little challenging - particularly at night. While far better than a Diablo or Murciélago there are times when I have had some close shaves when backing up against walls or sidewalk curbs. Many modern cars have integrated into their rear bumper (some the front also) an ultrasonic device that detects something close by and emits an (annoying) beep sound depending on how far away it is. After a recent close encounter in my Gallardo I decided to do something about it. Fortunately these devices today can be purchased separately and relatively easily installed in your car. There are a number of types available. Some just emit an increasing tone as you back up closer to an object. Others come with a LED display that gives the position and distance of the object. Since I already have a rear view camera in my car (I just forget to look sometimes!), I opted for the former types. I decided upon one called "Park-Pilot". It comes with a sealed "control box" a beeper and either 2 or 4 sensors. I opted for just two sensors. This short article describes how to install them in a Gallardo. The process would be very similar for other cars and is simple. The "Park-Pilot" package I used is shown in figure 2. I obtained it from Sports Imports LLC, However there are many other types and sources available on the web or in stores. Figure 3 below shows in a simple diagram how the unit is hooked up. The diagram is actually for a 4 sensor setup. I decided to use only 2 on the Gallardo. Properly placed (see below) this is more than enough. The only tricky part is that you have to locate the positive wire going to the reverse light at the back of the car. Just locate one of the two leads going to one of the reverse lights in the rear fender of the car. One lead is ground, the other will go to +12Volts when you put the car in reverse. Sorry I don't have a good picture for this, but to get to this light you need to remove the grill directly below the lights, remove the two screws that hold the light assembly to the frame and gently push the lights up to get you hand in to grasp the light wires, Fig 4. Splice the +12V wire to the power input of the Park-Pilot control unit (see below).
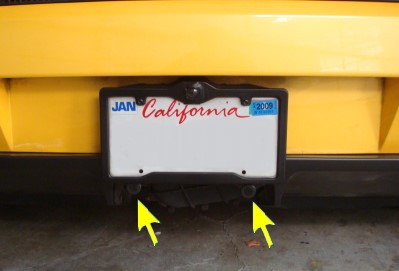
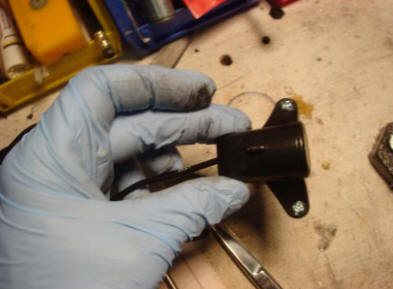
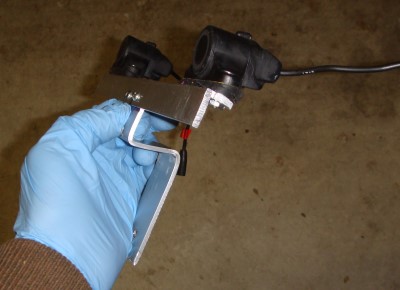
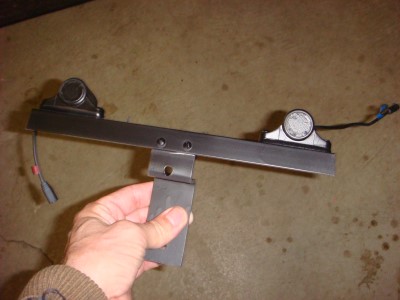
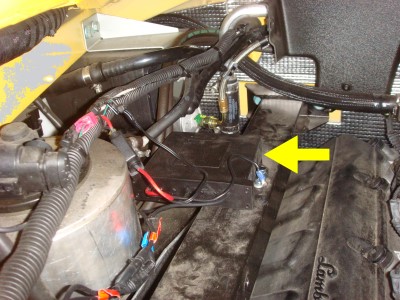
The only real challenge was deciding where to actually place the sensors. I did not want to cut into the bumper assembly itself. At first I tried attaching them to the frame under the car. However this was too close to the ground. They actually worked fine as long as the car was on flat ground but my driveway is sloped and they would go off each time I reversed out of my house. After A bit of experimentation I decided to attach them below the rear license plate of my car as shown in figure 1 above. I should say that I have not used the standard Lamborghini license plate holder because I have a rear view camera set into the frame of the license plate itself. This was an extension of a project I did way back when I installed my Eclipse NAV system. However the sensor support frame I use here would be almost the same as for a license plate with the OEM frame support. One of the two sensors are shown in figure 5. Two of these units are attached to an aluminum frame shown in figures 6,7 that I crafted. They are attached to the rear bumper as shown in figure 7. The wires going to the control unit (see below) go through a hole in the bumper behind the license plate. This hole also has a lead going to the rear view camera. The sensors (and camera) leads have a convenient disconnect socket (fig 8) so you can remove the bumper from the car to work on the engine etc. each sensor is attached to the frame via two screws. Park-Pilot supplies a number of rubber pads that sit between the sensor and the frame. They are cut at various angles to allow the sensor to sit completely horizontally. You need to fool around with these to get them this way. If they are pointing down they will false alarm. If pointing upwards sensitivity will not be good. The actual control box for the sensor unit can be placed anywhere. It appears to be completely sealed and waterproof. I placed it along the side of the engine frame as shown in figure 9. It is unseen when the engine side panel is reinstalled. I placed the actual buzzer behind the passenger seat. This requires one to run a wire from the engine compartment area through the engine firewall into the passenger compartment. Fortunately there is a Lamborghini supplied hole to do this. It is the same hole I used to string my rear radar detector cables through and is described here (fig 16-18).
This whole project should only take one or two hours, cost less than $100 for the equipment and well worth the piece of mind. One avoidance of a scratched/broken bumper will make it all worthwhile! |