|

|
|
|
|
||
Modification of Brake and Clutch Pedals
 |
A common complaint for drivers of Diablo's (and
perhaps other Lamborghini cars) is that the brake and clutch pedals are too
small and too close together. If one happens to be in stop and go traffic for
any period of time ones left foot can really get sore pressing of the small
pedal. The solution involves attaching a larger "After Market" pedal
plate. However things are complicated by the fact that the surface of the
Lamborghini pedals are curved making attachment difficult.
First a word of warning:- Any modification of brake and clutch pedals in any car is dangerous. If the plates are not attached properly they can slip off with repeated use or in an emergency causing your foot to slip with serious failure to stop the car quickly. Do these modifications only if you know what you are doing and at your own risk.
|
|
| Fig 1.Brake and Clutch Pedals in a Lamborghini Diablo | Second, this modification will require drilling three small holes in each of the cars pedals. For most people this should not be a problem since, if required, the Lamborghini supplied rubber pads can be reattached if need be at a later date covering the holes up. | |
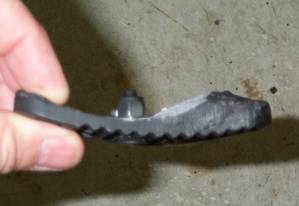
| There are many suppliers of brake pedal covers and they come in all kinds of designs and colors. For some the attachment is simply a matter of attaching the covers via clips with screws. In general I have found these unsatisfactory. First the screws protrude on the back side of the pedal and can catch in your shoe. More important thy do not fit well for this car. That's because the Lamborghini pedals are small and rounded. The covers tend to rock on the surface. The solution I came up with was to fill in the back of each brake cover with body filler (Bondo) and later carve out a rounded surface that fits snugly on the Lamborghini curved pedal surface. This can take a little patience (and creates a lot of dust). Fortunately I found that the curvature left by a 5" rotary sanding wheel is exactly the curvature needed. The photographs below illustrate different stages of the process. | ||
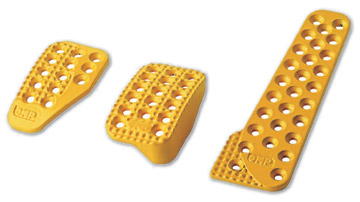 Fig 2. OMP 1010 Pedal Covers |
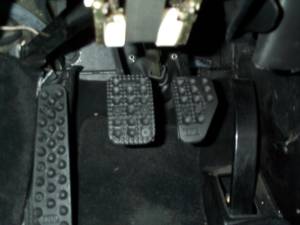
The particular pedal covers I used were the OMP 1010 brand (Fig. 2) which I obtained over the web from Pantera International in CA. As I said above there are many types. I like these because they have a rough surface. I got the unpainted Aluminum ones and sprayed them black with enamel black paint when done. A subtle point is that I switched the use of the Brake and Clutch pedal covers. The brake pedal has a sidebar to prevent your foot from slipping under it while on the accelerator pedal. That's not normally a problem in the Diablo. Instead I turned it upside down and used it as the clutch pedal cover. This prevents your left foot while resting on the left foot rest (see below) from slipping under the pedal. The other pedal cover supplied by OMP has one corner cut out of it and fits nicely so your foot does not press the brake when you use the accelerator. Finally look at the photographs carefully. The pedals are larger than the original ones. They should be spaced as far apart as possible so your feet do not hit both together. The fact they are big and flat and the angle against your foot can be customized makes for a much more comfortable feel when driving. | |
|
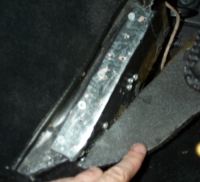
The second small gripe I have with the Diablo is the left foot rest. First it is too small, also the angle is too steep, but most of all it is sloped inwards, away from the driver, so your foot does not rest in a comfortable position. At least in my case my left foot hurts after a long trip "resting" my foot on this foot rest. I do not know why Lamborghini designed things this way. What is needed is a slightly larger foot rest sloped and positioned so your left foot rests flat on the surface of the foot rest perpendicular to the rest of your body and such that you can quickly slide your left foot over to the clutch pedal when needed. To attain such an arrangement I used the foot rest that comes with the above OMP brand. However instead of bolting them over the current foot rest area I made a metal bracket that changes the angle and slope of the rest (see fig 4). I used sheet metal and cut it into shape as shown in the photographs here (Figs. 4,5). Again it is important to make sure the whole structure is securely attached to the car. I used 1" metal screws liberally. To state the obvious: the screws should be large enough to secure the structure to the current foot rest (front and side) but not too long to protrude through the wheel well and contact the tire. The car foot rest is made of aluminum. You need to drill small holes in it to drive in the metal screws. The final photograph below shows the new brake, clutch covers with the foot rest. I was really delighted with the comfort this arrangement gave me.
|