 |

|
|
|
|
||
Changing the Radiator Stopcock in a Diablo
|
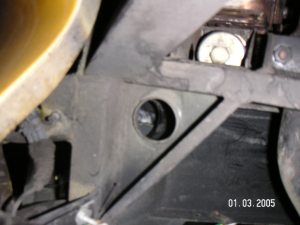
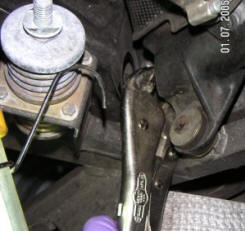
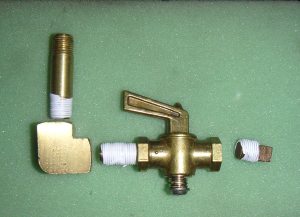
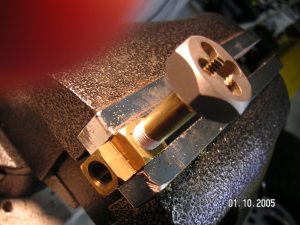
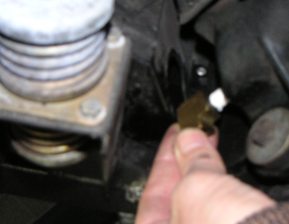
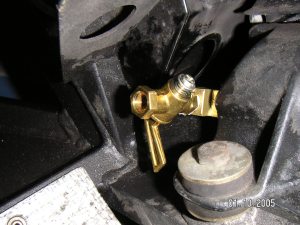
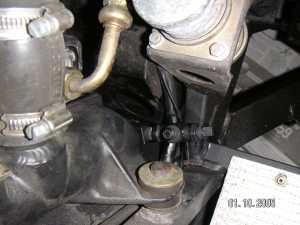
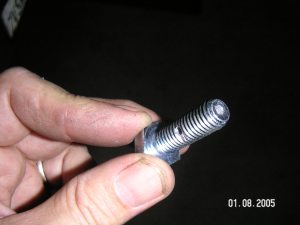
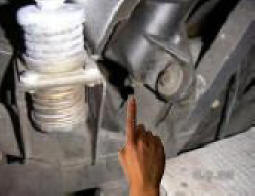
I describe here a fix in which we will replace the Lamborghini hard to open plastic spigot with an easily accessible brass stopcock. The whole process is quite a bit of work but will make changing the coolant easy next time around. It is very difficult to open the radiator stopcocks (there are two of them, one at the bottom of each radiator). They can be seen at a certain angle from under the car through a small port hole (fig 2). Unfortunately the drain spigot is made of plastic. It is easy to snap off the wings of the nut if it is tight. You do not have straight access to the nut. One person told me about bending a piece of copper tubing with a grove at one end to catch the nut. There may be other tools out there. I decided what is needed is to replace the plastic stopcock with a brass spigot that is easily accessible from above or beneath the car. The hard part is, that to do this, you need to remove the muffler box from the car. This is described elsewhere. With the muffler box removed one can easily open the drain stopcocks with a "Vice grip" as shown in figure 3. Note in order to let all the water drain out of each radiator you need to open the bleed nuts (fig 4) at the top of each radiator (as well of course the cap of the overflow/expansion coolant reservoir). What we will now do is replace this plastic part with a brass assembly shown in figure 5. These can be obtained from any hardware store in the plumbing section. The only complication is that that Lamborghini screw treads are metric. Consequently the part that screws into the radiator will have to be rethreaded to a 10 mm tread as shown in figure 6. Working with brass is easy, but make sure the treads are smooth (fig 7) -- you do not want to even think about the fitting snapping off as you screw it into the bottom of the radiator. Figure 8 shows the fitting being attached. Be sure to use Teflon tape on all joints. And be sure to use the o-ring that was used with the Lamborghini plastic stopcock. Figures 9 and 10 shows the complete assembly attached to the radiator. Adjust the spigot angle so it can be easily accessed from under the car. While not absolutely necessary I seal off the end of the spigot with a brass fitting to prevent dirt getting into it. This can be removed when you drain the radiator. Also to make things nice I spray the brass fittings with high temperature black paint (fig 11). Note if you do not wish to go to these elaborate lengths you can make a simple "poor-man's" stopcock by taking a metric 10 mm bolt drilling a hole through the center 3/4 of the way in and then through the treads drill a second hole at right angles to the first. When you twist the bolt all the way in it will seal off the radiator. As you open it out it will drain. This bolt is shown in figure 12. The problem is again it is very hard to get to it without removing the muffler.
|
||
 |
 |
 |
| Fig 2. Access port to stopcock | Fig. 3. Remove stopcock | Fig 4. Open air bleeds |
 |
 |
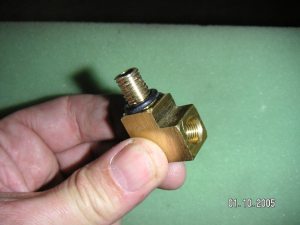 |
| Fig 5 New spigot assembly | Fig 6 Retread to 10 mm. | Fig 7 Ready to insert in radiator |
 |
 |
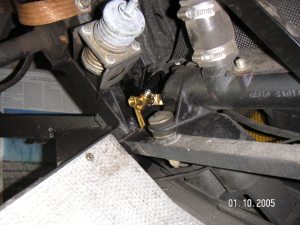 |
| Fig 8.
Inserting brass coupling
|
Fig 9. Spigot in radiator | Fig 10. Spigot in radiator |
 |
 |
|
| Fig 11 Spray brass
black
|
Fig 13 Simple stopcock screw | |
 Every
two years at least you should change the coolant in your car. Wet
cold winter days when you cannot drive is a good time to do this.
Unfortunately in a Diablo changing the coolant is not as easy as in
most cars. The reason for this is that the stopcock is very
difficult to find and open. It is quite common to have it snap off
in the process. Some people resort to draining the radiator by
disconnecting one of the hoses instead. This can be a messy process!
Every
two years at least you should change the coolant in your car. Wet
cold winter days when you cannot drive is a good time to do this.
Unfortunately in a Diablo changing the coolant is not as easy as in
most cars. The reason for this is that the stopcock is very
difficult to find and open. It is quite common to have it snap off
in the process. Some people resort to draining the radiator by
disconnecting one of the hoses instead. This can be a messy process!